pure css menu by Css3Menu.com
While going over this section I deleted all the respondants e-mail addresses because just about everything bounced.
My comments are in black. Comments from others in blue.
Fill the legs of your tripod with construction sand to add weight and stability.
Another vote for filling the tripod legs comes from Celestar owner Pete Everson who writes:
I enjoyed your page on the C-8. I have a Celestar 8.
1. Sand in the legs of the wedgepod overcomes tippy behaviour/tendencies
2. Large tubesocks folded double make good eyepiece holders for large eps I use a Rubbermaid tool
box for all accessories.
3. An alternative to a Orion soft case is the following: if you have a lifejacket with
a front zipper (size large, Mustang) you can surround the OTA and mount in the lifejacket and put it in a dufflebag.
Tony G sent this idea:
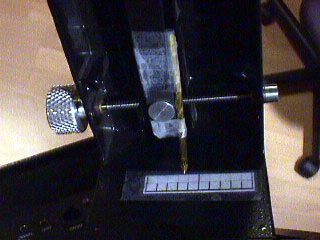
When searching for dim objects I've occasionally run out of travel on my C8 DEC adjustment knob. This usually means that I have to center the DEC knob, manually the scope up or down, and then reacquire the object I was looking for. This was the cause of some frustration until I came up with a low-tech fix. I taped a pointer (a long nail that I bent at a right angle)to the lever that is attached to dec screw. Then I measured the travel and created a grid of the same length (5 cm) on a piece of graph paper. I taped this under the nail and viola, instant indicator. Now I recenter my DEC knob whenever I'm going to move from object to object and I never hit the end of travel. Best of all it was quick and easy to do.
My name is Brian Ferguson,
I'm an amateur astronomer with a C8. For a living I look after
the small manufacturing facility of a large Vancouver BC area
testing laboratory.
My tip is as follows:- Turn plain socket head cap screws (hex drive) as supplied with your scope into no tool knobs cheaply, by pressing on "shear-loc"(registered) instant thumb screw knobs. These are available in different styles, eg. "tee" and "rosette". I find the rosette type to be the most useful. They come in various colours, black being the most desirable I think. Contact a well stocked industrial supplier to obtain these items. No astronomy club should be without a selection of this product on hand.
The plastic corrector lens cover changes size as the temperature changes and falls off. Use an inexpensive shower cap as a corrector plate cover.
Leave the visual back on your scope when storing and use a 35mm film can as a dust plug.
Line the inside of your tube with Edmund Scientific self-adhesive black flocking paper to reduce glare.
Philip Williams has come up with an inexpensive alternative to Celestron Vibration Pads:
1) Buy 3 x dense rubber 1.75" bath plugs, with the hollowed base. (US$ 0.50 equiv. each here)
2) Remove the chain connector (or moulding) from the top.
3) Invert...voila!
The hollow provides a rim which retains the tripod feet. The best
plugs to use are thick and dense with a shallow hollow. If you
can only find those with a deep hollow, insert a suitable 1.25"
rubber blank to add the required thickness.
When collimating your scope, buy 3 Allen wrenches (5/64") and insert one in each collimation screw hole. This will eliminate fumbling around for the hole in the dark and the need to shine a flashlight during the collimation process. (Thanks to robradio on the Undernet #sciastro IRC channel for this one.)
A fishing tackle box makes a cheap and efficient way of carrying the small parts and pieces for your scope. I keep my wedge bolts, telescope bolts, tools (screw drivers, allen wrenches..etc), extra batteries, compass (for rough pointing of scope to the north) and a host of other small parts in a tackle box. If you can use ALL the compartments in the case and return items to their proper compartment - it only takes a glance to see if you are missing anything before packing up to head for home.
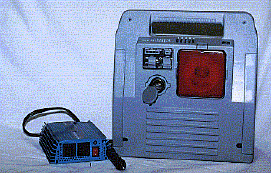
If you are not interested in astrophotography, you can find inexpensive DC to AC inverters at your local Target or Wal-Mart. Orion sells the same thing, but they are cheaper at the discount stores. They will not provide tracking control, but they will run your AC motors just fine. While you are at Target, look for the PowerJumper battery pack. This self-contained pack is a 12 amp/hour battery and sells for about $10 less than the Orion 8 amp/hour unit. I can run my C-8 and dew heater for about 6-8 hours on this unit.
Building a tripod shelf gives a lot of area to store items and eyepieces. Using a hole saw will give you perfect 1.25" and 2" eyepiece holes. I use small brass angle brackets to mount the shelf to the tripod legs.
Find and carry a roll of red cloth tape! You can usually find this in most department stores. It is absolutely invaluable for dimming down novice's flashlights, bright interior lights in cars and a host of other uses.
If you use Celestron's Advanced Astromaster digital setting circles, you know there is a small 8x32 screw used to secure the RA encoder. This is an easily dropped and lost piece. Go to the hardware store, buy a couple dozen and keep them in that 35mm film can that you use to plug your visual back.
A bit more difficult modification is to install telephone RJ-11 plugs on your encoders for the AAM. Putting on and removing the small paddle boards occasionally ended up bending a pin on an encoder. I cut the wire to each encoder and installed a male RJ-11 on each end of the wire. To make the connection, I use an inline RJ-11 connector which has a female connector on both ends. The paddle boards remain on the encoders at all times and I just unplug the RJ-11 when tearing the scope down at night.
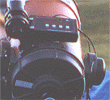
Mounting the control box for the AAM can be a pain. I finally put a piece of Velcro on the top of the tube on the C-8 and on the bottom of the AAM. I have an 8x50 finder on the scope and wedge the left edge of the AAM under the alignment screws on the finder mounting rings and then press the AAM box down onto the Velcro. This holds the box much more securely than just the Velcro alone.
Back when the C-8 first came out, several dealers sold LED kits for the setting circles. These had small red LED's taped to the fork mount that provided a bit of light for reading the analog circles. They were designed with a 9v battery and used a 555 type IC. Hit the button on the battery box and the LED's would light for a minute or two and then automatically go out. A similar device could be added to your scope if you use the analog circles. A small project box from Radio Shack with a 9v battery, an on/off switch and a couple LED's with dropping resistors gives you an easy way to read your circles.
Bob Berta adds these tips and comments:
Saw your WEB page....some good
tips. I am a tinkerer and have done a lot of stuff to my new Celstar
Deluxe (Fastar compatible/black tube) and also noted some areas
to check for problems.
First the warning. The heavy duty tripod from Celestron is a great
tripod but a couple of users have noted that there is a white
plastic shim between the clamping mechanism and the inner leg
that has moved on some tripods. If this happens and that piece
falls out you can have the screw clamp as tight as it will go
and it won't hold the tripod up....it will collapse! To check
this just run a finger or look at the crack between each side
of the clamp to make sure that when clamped down there is still
about an 1/8" of space or so. If the crack is non-existant
than you may have lost this piece or it has shifted around. The
piece is held on with adhesive on one end. As near as I can tell
it looks like it is an assembly problem....they may have not located
it fully where it is supposed to be or the adhesive "creeped"
allowing the piece to move. Other than that my scope has been
fault free.
I also recommend taking a screw
driver and checking the tightness of all the various mounting
screws between the fork and scope OTA. I haul mine around in a
car and after one trip I noted that one of the screws that mounts
the OTA to the fork was a little loose. Don't overtighten any
screws....just snug them down....you don't want to strip anything.
Now for the tips:
Vibration reduction.....Remove any stock "crutch tips"
from the tripod it will be more stable. For ultimate vibration
the Celestron Vibration Reduction Pads really do work....I couldn't
believe it but it was VERY obvious. I noted that they even damped
out wind induced vibration. Many think that this is just a rubber
tip or pad....it isn't....it is made of two hard plastic cups
that sandwhich a Sorbothane type material. Vibrations are damped
out by the material but it does NOT cause any problems with tripod
movement unlike the thicker crutch tips.
I prefer the Celestron hard
plastic dew caps over the foldable type because of the next two
tips.....to reduce vibration even further take two lengths of
steel chain about 1" links and maybe 1 ½-2' long
and hang them from the very forward lower edge of the dew cap.
The chain will dampen vibration in a very effective manner.
While you are sticking things
on the dew cap here is another great one. Instead of using one
of those sliding weights on a bar I prefer to buy about 3- 8 ounce
lead fishing weights in rectangular size. I back each one with
a strip of velcro and a matching Velcro longer strips on the dew
cap forward end. Now you can select various combinations and adjust
the placement to balance out the scope on the fork. This is a
lot more portable than the bolt on weight system since you can
simply put the three weights in your tackle box. I find that the
1 ½ lb is just about perfect for my off axis setup with
a Lumicon off axis guider and a heavy Nikon camera. One 8 ounce
weight is about right with one of my heavy Pentax XL EPs.
Another tip which you actually
talked about on your WEB site but could be improved is the use
of a 35mm plastic film can inserted in the Visual Back. I took
one and used a 1/16" drill to put a bunch of holes in the
bottom nearest the inside of the scope. Now get some small packages
of Silica Gel moisure absorbent and place it inside the 35mm film
can. Now this will absorb any moisture inside the scope reducing
the chances of mildew and/or fungus on the mirror, secondary or
corrector plate. You will need to remove the Silica Gel about
every other month or so and place it in a oven at around 150-200
degrees for 4-5 hours or so to dry it out and revitalize it.
I was able to buy the bulk material and the one I got is blue
when dry and clear/pink when loaded with moisture. Most eyepieces,
Etc. come from the factory with one or two of these little packages
thrown in.
Final comment....while Celestron is a great scope it suffers from
one equipment choice...as does Meade and Orion and probably most
other scopes. The included star diagonal is just marginal. Get
a GOOD mirror star diagonal with an enhanced mirror. I have a
Lumicon and note in comparisons the sharpness and contrast is
very obvious as is the brightness of the image. The improvement
in brightness is nearly the equivalent of another inch of additional
aperture.....cheap way to get a 9" scope!
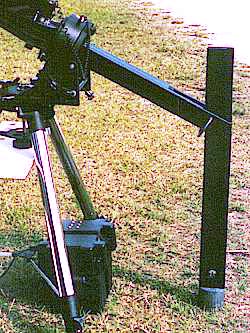
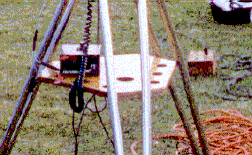
Some of the worst "springiness" in the tripod-wedge combination is a rocking in a direction parallel to the polar axis. Here is a solution I saw at the Winter Star Party last year. It appears to be a 1x4 upright and a 1x4 horizontal member. The horizontal member has a pair of additional 1x4s fastened to it to give a slotted effect at the end. On the base of the vertical member is a large lead weight. The horizontal member is secured to the vertical by a C clamp. It would appear the scope is polar aligned and then this device is pushed against the bottom of the scope and equatorial wedge to provide a bit of thrust against the cantilevered weight of the scope. I didn't have an opportunity to try the device, and would be interested in hearing anyone's experience with something similar.
Since publishing this web page, I received e-mail from the creator of the above pictured stabilizer. Here's what Bruce Collier has to say about his device:
Just happened to stumble on
to your web page and saw a picture of my C-8 at the 97 WSP. The
RA stabilizer that you describe is actually held to the base by
a 1/4" 20 threaded rod.
The upper portion of the stabilizer
was made of 1x2 and 1x3. A 1/2" disk of plywood was glued
and screwed at the top. The bottom portion was a 2x4 with
a 14# lead weight at the base. The top part was attached first,
then the mount was polar aligned. After alignment, the bottom
part was attached using a C-clamp.
Now that you know how it was
made, BUILD IT! You won't believe what a difference it makes.
I had a lot of stuff hanging from my scope, camera, ST-4, Pronto
guidescope, six pound counterweight. The improvement in stability
was probably 10 fold.
Eyepiece cases can be expensive. Check your local large camera store for Doskocil hardsided camera cases. These are not cheap, but they are less expensive than cases being sold by some dealers. The die cut foam can be easily modified to fit your particular eyepiece collection.
The field tripod is an unwieldy beast at best. You can get an inexpensive case for it at your local sporting goods store. Check out the bow cases in the archery section.